Monday, October 11, 2010

Enchiladas for two (or for one, x2)

Greetings, readers - at last you get a post written by me (Ryan)!

With Brenda gone for two weeks, my meals have been mostly uninspired and a bit erratic. Last night I was getting hungry but also feeling very lazy. I didn't feel like driving anywhere and the only prepared food we had in the house was canned soup and boxed mac-n-cheese. While the mac-n-cheese was tempting, I figured with only a little more effort I could probably make one of my favorite dishes of all time, Cheese and Onion Enchiladas. Taking style tips from Mark Bittman's "Minimalist" philosophy, I tried to make these as simple and straightforward as possible. Read on...

Basic recipe:
  • Preheat oven to 350°F and heat about a tablespoon of oil in a small skillet.
  • Saute about 1/3 cup of diced onion (I used about one quarter of a very large red onion) with a good shaking of chili powder (a tablespoon, maybe?) and some salt until nice and soft.
  • Grate about half a cup of cheese, set aside (I used about a quarter of a brick of cheddar, plus a couple of mozzarella string cheeses, for meltyness).
  • Remove onions from skillet to a bowl, add more oil to about 0.25" depth, and bring up to medium-high heat (350-375°F)
  • Briefly fry 6 corn tortillas in the oil, no more than about 10-12 seconds each until they poof up, get soft, but not appreciably brown or crisp. Remove and drain on paper towel
  • From a 10oz can of enchilada sauce, pour a thin layer in the bottom of a 5"x7" baking dish
  • Place about a tablespoon and a half of cheese, and a tablespoon of onions in the center of each tortilla, roll up, and place in baking dish. Repeat with remaining tortillas
  • Top everything with the remaining canned sauce
  • Bake for 25 minutes
  • Eat and enjoy
The whole prep/stovetop portion took no more than 10 minutes, if even that. I kept to my Lazy Ethos by shredding the cheese in the food processor, which took about 10 seconds. I could have saved even more time by using bagged, pre-shredded cheese but I didn't have any of that. Yes, I could have spent more time by making my own sauce, but the canned kind is tasty and cheap and easy.

An added bonus: since I had all that nice hot oil, I took the opportunity to fry up the ragged and torn tortillas in the package into some delicious chips. Just fry chip-sized pieces until golden and crisp, about 2-3 minutes.

The enchiladas came out fantastic. I didn't bother topping them with anything but a squeeze of lime juice; they really didn't need anything. The quantity would easily serve two people, but I ate half and saved the rest for lunch the next day...

...and then ended up eating them for breakfast instead (that's a cappuccino with them, not a beer):


They were just that good.


Monday, August 30, 2010

Zucchini 101: Or 101 Ways to use 101 Zucchinis

When you are lucky enough to plant a zucchini seed in the spring, you will be rewarded with thousands and thousands of squashes later in the summer. I planted 6 zucchini seeds and 6 yellow (summer) squashes. Meaning:

Thus, we have been trying interesting ways to slice, dice, shred, bake, saute, puree, broil, and grill (and give away!) these summery vegetables before they wither away and stink up the fridge.

#1. Soup!!!

When the weather is 90º+, you wouldn't immediately think of enjoying a steaming hot bowl of soup. But in the last few weeks we have made two spectacular squash soups that are both easy and refreshing. We 'winged' these soups with stuff we had, so these aren't exact recipes.

Variation A: Curry soup
We added some garam masala and curry powder to the bottom of a pot over medium heat with a teaspoon of oil, and stirred until fragrant. Then we chopped up a quarter of a red onion and sauteed it in some oil with the spice mixture until the onions were brown and caramelized. With about 30 seconds left, we smashed up some garlic and added a small bit of minced ginger and added them, stirring until fragrant. I chopped up 2 medium squash into about 1" pieces and threw them in the pot. We tossed until coated and cooked down for about a minute before adding enough low-sodium (you always want to be able to control the seasoning to your liking!) chicken broth to cover the squash pieces. We let everything cook down for 25-30 minutes until the zucchini were soft enough for a fork to pass right through. We threw the mixture in the blender until smooth, then added salt and pepper and a sprig of fresh cilantro. I would leave out the cilantro next time, but man was this tasty!

Variation B: Spicy Velvet Vegetable
Much like last time, we caramelized about a quarter of a red onion for 10 minutes in the bottom of a pot. Meanwhile, I diced up 1 russet potato, 1.5 medium carrots, and 2 medium zucchini (seeded and peeled) into about 1/2" chunks. We roasted some small poblano peppers under the broiler until the skin was charred, and toasted some cumin and coriander seeds in a small pan over medium heat. I let the peppers steam for a few minutes after coming out of the broiler, then peeled off the skins and removed (most) of the seeds. When the onions were brown and soft, we added some garlic and cooked until fragrant. Then we added the potato, pepper, carrot and squash and covered with LS chicken broth. About 10 minutes into the cooking, I ground the cumin and coriander in an old coffee grinder and added them to the soup. It cooked for another 10-15 minutes until the potatoes and squash were tender. Blended until smooth and seasoned to taste. This was a fantastic variation of the soup, with some mouth-heat coming from the roasted peppers, but the potatoes really provided a velvety creaminess that made it seem like we had used a splash of cream.

#2. Zucchini pancakes

Much like latkes, these delicious vegetable pancakes go well with sour cream or applesauce. We made these a while ago so I don't remember exactly which recipe we used, but this one looks similar:

http://www.seriouseats.com/recipes/2010/08/the-crisper-whisperer-zucchini-pancakes-recipe.html

Just fry them up and enjoy!

#3. Zucchini grinders

We tried this recipe last year and liked it so much we used some frozen squash last winter to make these.

Preheat oven to 350º

1 medium squash, sliced long-wise
1 cup (estimate) marinara sauce
Hoagie rolls
Foil
Mozzarella

Cook squash in medium pan with some olive oil over medium heat until translucent, adding salt, pepper, red pepper flake, and oregano to taste. Add sauce to pan until warm. Meanwhile, spray two squares of foil with cooking oil. When mixture is ready, add to almost-split hoagie rolls (we've tried pre-toasting and it doesn't make a difference), top with mozzarella and roll up in foil to make a sandwich log. Put in oven for 10-15 minutes to melt cheese and warm roll. Open pouch of deliciousness and enjoy! Warning: May be messy!

#4. Breakfast burritos
Luckily, squash doesn't have a really strong flavor. So, we shredded some up with some potatoes and added to some scrambled eggs, sausage and cheese for some delicious breakfast burritos!

#5. Pasta Primavera
This was pretty simple: We cooked up some chunks of zucchini, carrots, and peas in a small amount of olive oil until tender, boiled some bowtie pasta, and simmered a few garlic cloves in some olive oil, tossed together with some halved cherry tomatoes (also home grown!), parmesan cheese, and a little of the pasta water (for the starch) and topped with some browned chicken (for me) and pan fried shrimp (for Ryan). Quick and easy!

#6. Zucchini, tomato and cheese skillet
This is an old family favorite summer side dish. Slice a medium zucchini into coins, add to large skillet with a tablespoon of oil and season with salt, pepper and oregano. Cook zucchini (don't forget to turn them over!) until translucent. Add diced tomatoes (or halved cherry tomatoes) and cheese (your choice, although cheddar is pretty darn good) until melted. Yum!

#7. Zucchini Bread
Old favorite. There are many recipes for this, but my family likes to add chopped walnuts and chocolate chips!

Ok, so I only made it through 7 dishes, but we have made a pretty good dent in our stash of zucchini so far. The plants are slowing down a bit thanks to an outbreak of powdery mildew...:( but maybe this will give me a chance to catch up and process the back log of squash that we have (I shred with the food processor, or dice into 1" cubes or slice into coins and freeze).

How do you enjoy your summer squash bounty?

Monday, June 14, 2010

The Perfect Pizza

I can't remember the last time we ordered pizza for delivery, because we have finally figured out how to make the perfect pizza at home. We used to think that homemade pizza could never come close to pizza made in a restaurant / for delivery, but much like hamburgers (that's another post!) we have finally figured out a few key techniques and secrets to making The Perfect Pizza.

Tonight's menu: Mango Habenaro Sausage, Tomato, Basil, White Pizza

A while back we came across a recipe for pizza dough that looked easy and tasty, with the key being to use a food processor to bring the dough together. With some modifications, this has now become our standard pizza dough, and the recipe makes enough to divide in two and freeze half for another occasion (see recipe below). Given the amount of moisture in the air tonight, the dough came together with less than a cup of water (normally, thanks to the extremely low relative humidity in CO, it takes more than the called for cup of water). We let the dough rise twice while we did some much-needed yard work after the past weekend of rain. Normally we either have some tomato sauce frozen or whip some up quickly during the last dough rise, but this time we thought a white sauce sounded interesting. Ryan melted 2 Tbsp of butter in a small sauce pan with two crushed cloves of garlic for a few minutes over low heat. He added 2 Tbsp of flour with cayenne, salt and pepper, and then added a cup of milk. As with a standard bechamel sauce, he cooked it until it thickened to our desired consistency for pizza sauce, and towards the end we grated in some parmesan cheese.

Meanwhile, I dealt with the toppings. Over the course of our trial and error with pizza making, I've come across two secrets:
1) Spin-dry fresh tomatoes in a salad spinner (or otherwise drain/press out some of the water). I normally dice up a fresh tomato, and we noticed that it leads to really wet toppings which almost always results in a bad case of Topping Slide.
2) Good cheese makes all the difference. Being pretty lazy, we always used to buy the bags of shredded mozzarella. One night we invited my sister and nephew up for pizza, but asked them to bring some cheese after realizing we didn't have any. She brought a package of unshredded mozzarrela, and we immediately tasted the difference. One thing to note is that it's hard to shred such soft cheese with a grater (or in the food processor); I have started just tearing it into little hunks, and this works really well on a pizza because it fills in the topping gaps as it melts.

I then sliced up some pre-cooked mango habenaro sausage and we were ready to roll.

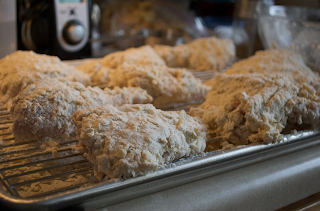
Here is the pizza pre-cooking:


In our oven, we have found that 450º on convection bake for 12 minutes give the perfect amount of browning and doneness on the underside of the pizza (I have heard this referred to as the "skirt"). If you don't have a convection oven, I'd probably raise the oven temp by 25º and keep an eye on it.

Here is the pizza cooking (I can hardly wait for it to be done!):


And here is the final product:


This pizza was so good we nearly ate the whole thing (but resisted so I can have some in my lunch tomorrow!) We even froze the other half of the pizza sauce and the other half of the dough, so the next pizza will be already nearly made!

Pizza Dough:

Recipe from Mark Bittman, adapted for high altitude by R. Cabell, adapted for flavor by B. Cabell

Yield: dough for one very large or two medium-to-large pies, depending on crust thickness preference
Time: 45 min to overnight, depending on your patience

2.5 tsps active dry yeast*
3 cups flour, any mix you like**
1.5 tsp kosher salt (adjust +/- 0.5 tsp to taste)***
2 tablespoons extra virgin olive oil****
1/3 cup very warm water (110F)
1+ cup room temp water
Flavoring extras: crushed red pepper, basil, italian seasoning, garlic powder

1) Bloom yeast with tiny pinch of sugar in 1/3 cup very warm water, wait 5 minutes to ensure viability
2) Process flour and salt in food processor (metal or dough blade, doesn't matter) for 10 seconds to combine
3) Pour yeast+water and oil over top of flour, sprinkle in spices (a good pinch of each or any combination will do), and process for 10 seconds to integrate
4) Slowly add 1 cup of water until dough forms one large ball (a few extra crumbs and bits doesn't matter as long as most of the dough is in one mass). This may take a little more to a little less than a cup of water depending on the dew point, temperature, location, moon phase, flour composition, etc.
5) Continue to process for another 10 seconds or so.
6) Turn out dough onto floured board, knead 10 times or so, form into tight ball
7) Place dough in oiled bowl, cover, and let rise to roughly double its volume (30-45 minutes depending on environmental conditions)
8) Use immediately -or- fold dough to deflate ("punch down") and repeat up to three more times -or- place in fridge for 8-10 hours -or- fold to deflate and freeze

Notes:
-We have done a refrigerator rise with success
-We often make the whole batch, divide after the 1st rise and freeze 1/2 (letting the other half rise once more). One note with freezing is it seems to develop a "crust" when rising after defrosting, but it still tastes good

*For those in Colorado and high places: Instant yeast doesn't work very well at high altitudes unless you're doing a very slow cold-rise. If using instant, reduce to 2 tsp
** We use half-and-half All purpose flour and bread flour. The bread flour really helps to make an elastic product, but you could use all AP if you only have that. Using whole-wheat may increase water needed.
***Kosher salt is really recommended, but reduce amount slightly if you are using table salt. DO NOT leave out the salt all together, though!
****You will be rewarded for using a flavorful, good quality extra virgin olive oil at this step!

Wednesday, June 2, 2010

Copper River Salmon

The other day, we were shopping for interesting seafood to serve at a party for some friends. Usually King Soopers has a pretty lackluster seafood case, and we often end up just getting prepackaged salmon filets from Costco. However, last Sunday they had beautiful looking sides of Copper River Salmon; enough for me, a mere seafood liker (not lover), to order up one of them without looking at the price. $43.28 later we had almost a 2 pound slab of gorgeous deep orange fish, and I had a little buyers remorse.

The most recent America's Test Kitchen episode we had seen was about grilling salmon, and they emphasized that grilling salmon tends to almost always result in leaving a good amount of fish on the grill. Their solution was 10 coats of vegetable oil applied to the hot grates, and we fully intended to do that until we found a cedar plank in the kitchen and figured it would not only taste good, but ensure that all of our pricey deliciousness made it to the plate instead of getting left behind on the grill.

We fired up only one side of the grill, leaving a "cool" side on which to cook the salmon so the plank wouldn't catch fire and the salmon would have a nice, even, gentle heat. I patted the salmon dry with some paper towels, sprinkled on a little kosher salt and some lemon garlic powder, and headed out to the grill.

I can't really say how long it took (maybe 15 minutes?), but we pulled it when our Thermapen registered 125º.

It was, hands down, the best fish we have ever cooked at home. So buttery and moist, just a light garlic/lemon crust, perfectly done with a touch of smokiness from the cedar plank; not the least bit fishy. It disappeared so fast I didn't have time to get a picture (well that and I was too busy eating it myself!) We had actually cut off a piece to enjoy ourselves later in the week, so we cooked it up in the same fashion tonight and it was just as delicious, two days later. I might become a seafood lover after all!

It was 100% worth the cost, and I think we will be going back and getting more while it's around (I think the season is May/Juneish)!

Thursday, April 29, 2010

A Spring Treat (Rhubarb Bread Pudding)

We harvested a healthy amount of rhubarb earlier this week and thought it was time to try some new rhubarb recipes (don't worry, I'll be making the old favorites as well). Low and behold, Ryan came across a recipe for rhubarb bread pudding today on Serious Eats.

Since we have been out of town and haven't had a chance to go grocery shopping, we had to pull together some ingredients from the back of the freezer (namely half a loaf of old Challah bread instead of the cinnamon raisin bread) and improvise (we had whipping cream and 1% milk, which when mixed together gives you 1/2 and 1/2, right?), as well as halve the recipe. It was really easy and mostly hands off.

Here is the bread pudding in the oven.

The next step is to make a whiskey sauce to pour over the top, which I let Ryan do because he's the sauce maker in the house. Haley likes to watch us cook--we like to think she's interested in what we are doing, but probably she's waiting for one of us to screw up and drop a jackpot of delicious custardy bread.


The end product was delicious! We both thought the whiskey sauce played nicely with the rhubarb and the rhubarb added a nice tang to the bread pudding. We both thought it actually could benefit from a little more rhubarb, and the whipped cream/milk did a fine job. All in all, it was a pretty eggy/custardy product using the challah, and definitely something I would make again.

And the best part? It hardly put a dent in our stash of rhubarb!

Sunday, April 11, 2010

All-American Picnic

We frequently watch America's Test Kitchen and Cook's Country and think "we should try that". Between a recent episode called "All-American Picnic", Ryan's craving for fried chicken, and a beautiful weekend, we decided to give some of the recipes a try.

The side dish was "All-American Potato Salad" (you can find these recipes on their website). Both of us generally shy away from homemade potato salad, but this looked interesting and relatively quick. The "secret" to making this was to add pickle juice to the hot potatoes, which absorb flavor "like a sponge" when hot (but if you add the mayo at this point, the salad will turn out dry). I didn't measure the chopped pickles and added only 1/2 of the called-for 1/2 red onion, and both Ryan and I thought it was a little oniony. Next time I will make sure to add all the pickles (we think it might balance out the onion flavor). Otherwise this tasted fantastic and was a mostly hands-off hour long process.


The main course was extra-crunchy fried chicken. It looked like a pretty simple recipe, and having failed multiple times in the past trying to get that true crispy crust that only seems achievable if you are a southern colonel, we dove right in. The recipe calls for a whole chicken, cut up into 8 pieces and marinated in a buttermilk brine for an hour. During this time, we realized we forgot to get peanut oil at the store, but a quick trip to Walgreens for a $4, 32 oz. (!!) bottle of vegetable oil saved the day. The "secret" to getting the extra-crispy is to make a sort of shaggy flour breading to pack onto the chicken (they noticed that the last few pieces they breaded generally got that crisp crust due to the clumpiness of the batter) by adding a small amount of buttermilk to the flour /seasoning mixture. Everything looked beautiful at this point as the oil continued to heat up to 375º, and we thought we were 20 minutes from the best fried chicken meal outside the White Fence Farm.


Ryan added the chicken to the dutch oven, and put the lid on like the recipe says. One thing they note is that the temperature will drop significantly, but you shouldn't turn the heat up or the end result will be burned. Ryan immediately thought as he was adding the chicken to the
pot that it was way too small to fry up the entire chicken at once, but that is what they had done on the TV show. So alas, he threw in all the chicken parts and lidded it up. A few minutes later, he opened it up to check the temperature, and it had dropped to 240º, which was WAY too low, so he turned up the heat and moved around the pieces to find that the large ones at the
bottom had burned, and in the meantime the "cool" ones at the top were loosing their breading like a chicken molting. We went into "rescue" mode from there and took out half of the pieces and tried to fry them in two batches. The end result was a variety of pieces, some with burned bits, some with no crust, and some looking perfect:


We took our meal outside and enjoyed a "picnic" in the waning daylight with a glass of beer. Overall the chicken tasted really good, was exceptionally moist, and the pieces with breading were, in fact, extra crunchy. Our impression was that this recipe has potential, but there are lessons to be learned:
#1) Don't crowd the pot. Fry in batches if making a lot of pieces.
#2) Heat management. Keep an eye on the temperature, keep things moving in the pot so you don't end up with "hot" and "cold" spots.


Tuesday, March 30, 2010

Spices

I'm sure we are all guilty of it: That little red and white tin of ground spices from the 1980's (70's? 60's??) hanging out in the back of the pantry. Ground cardamom, who uses that anyway? Well, I'm here to tell you that grinding your own fresh spices is worth it. The aroma of toasted, freshly ground cumin is heavenly. Coriander? You've never smelled such pungent, fruity, floral aromas.

Tonight we are trying to make a chicken tikka masala, a recipe we watched Alton Brown make last night on Good Eats (recipe can be found at http://www.foodnetwork.com/recipes/alton-brown/lamb-tikka-masala-recipe/index.html). Sure, we don't have a tandoori oven, but we are going to do our best with a grill and some chicken instead of lamb. The recipe calls for cardamom seeds, and unfortunately (fortunately?) we found cardamom pods at Cost Plus World Market. So, for about 10 minutes I painstakingly busted open each pod and released the seeds. After about a tablespoon (the recipe calls for 2 tablespoons), decided that would do and cut the recipe in half (turns out we didn't have enough coriander seeds for the full recipe anyway). Man-oh-man did the toasted spices smell good, and even more spectacular when I ground them (a repurposed coffee grinder makes short work of that process!) We actually had a store-bought ground Garam Masala, so for kicks I compared the smells of the two: the store bought has a stronger cinnamon hue, while my fresh recipe is much fruitier and crisp, with layers of flavors.

So go throw those old tins away. Stop flavoring your food with "old cardboard box" and spice things up!

Ed note: Ok, so the chicken tenders were, well, a bit too tender to hold up to the skewers and grill, so we ended up grilling them in a basket. It took longer too because our grill just couldn't keep up 800ºF. But oh, how delicious it was when it came together! The tomatoes were nice and bright and flavorful after stewing with the seasonings, and well, I just love the combination of coconut milk, tomatoes, and jasmine rice. We have another recipe for curry that is similar but simpler, so we might stick with that. But grinding our own spices was definitely worth it!